
 English
 China
China Thailand
 Malaysia
 Vietnam
 Laos
Laos Cambodia
 Pilipinas
 Indonesia
 Russian
 Portuguese
 Arabic
 Japanese
 Spanish
 Italian
 French
 German
News
- Home
- News
- Company News
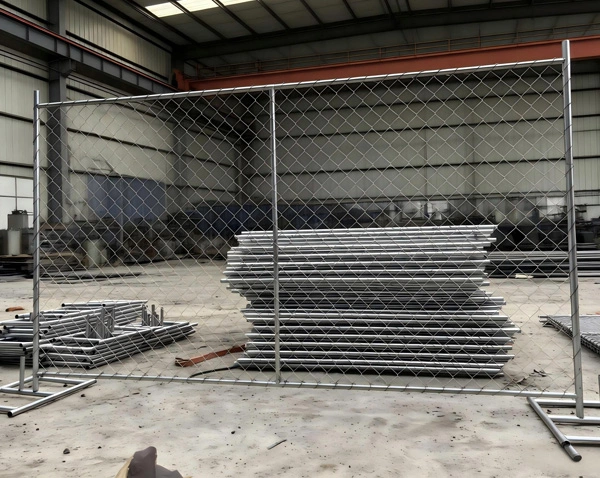
Before delving into the installation process, it's crucial to understand what a welded temporary fence panel is and its applications. These panels are typically made from durable materials such as steel or aluminum, designed for quick setup and removal. They offer an effective solution for securing construction sites, events, or areas undergoing renovation. The key feature of these fences is their welded joints, which provide superior strength and stability compared to non-welded alternatives.
To install a welded temporary Fence panel efficiently, you need to select the right materials and tools. High-quality panels should be your first choice; they come in various sizes and designs to suit different needs. Additionally, ensure that you have all necessary tools at hand, including a post driver, level, measuring tape, stakes, and safety gear. Choosing the correct type of posts (either metal or wooden) will also play a significant role in the overall stability of the fence. Metal posts are more durable and resistant to weather, making them ideal for long-term use, whereas wooden posts can be more cost-effective but require regular maintenance.
Site preparation is a critical step that often determines the success of any fencing project. Start by clearing the area where the fence will be installed. Remove any debris, rocks, or vegetation that could interfere with the installation process. Next, measure out the perimeter and mark the spots where each post will go. It's important to ensure that the distance between posts adheres to the manufacturer’s guidelines to maintain the structural integrity of the Welded temporary fence panel. Once the locations are marked, dig holes for the posts, ensuring they are deep enough to support the height and weight of the fence.
The actual installation begins with setting up the posts. Use a post driver to firmly secure each post into the ground, checking regularly with a level to make sure they are straight. For added stability, consider filling the bottom part of the post holes with concrete. After the posts are in place, attach the welded temporary fence panel to them using appropriate fasteners. Ensure that the panels are aligned correctly and securely attached to prevent any gaps or weak points. It's also advisable to periodically check the tightness of the connections during this stage to avoid any future issues.
Once your welded temporary fence panel is installed, regular maintenance is essential to prolong its lifespan and ensure continued functionality. Inspect the fence regularly for signs of wear and tear, such as rust, loose fittings, or damage from external factors like weather or accidental impacts. Addressing these issues promptly can save you from more costly repairs down the line. In case of minor damages, simple touch-ups with paint or replacement of small parts might suffice. However, if there is significant damage, it may be necessary to replace the entire section of the fence to maintain security and appearance.
In conclusion, installing a welded temporary fence panel can significantly enhance both the security and aesthetics of a site. By following the steps outlined above, from selecting the right materials and preparing the site to maintaining the fence, you can achieve a professional-looking and highly functional barrier. Remember, the key to a successful installation lies in careful planning, attention to detail, and regular upkeep. Whether for a short-term event or a long-term construction project, a well-installed welded temporary fence panel provides a reliable solution for your fencing needs.

Leave a Reply